Showing posts with label Lenses. Show all posts

Wednesday, December 3, 2014

Happy holidays

Nikon D7000, Lensbaby Scout with single glass optic, 3 sec., sunburst aperture, cropped

Here’s something fun to help kick off the holiday season. This photo was done entirely with the camera. Other than a small crop, I didn’t do a thing to it in Photoshop.

What you’re looking at here is a six-inch-tall creche (propped up on a support) with our Christmas tree in the background.

I achieved the effect by using a Lensbaby Scout with a single glass lens and a sunburst aperture. Rather than a standard, circular aperture, the disk for this shot was a shape. You can see the edges reproduced in some of the less fuzzy sunbursts in the background. The in-focus foreground is unaffected; the creative aperture works like a plain old circular hole. But bright light sources in the out-of-focus background take on the shape of the aperture. It’s tricky to get it to work just right, but when it does, it creates some interesting images.

The single glass and narrow depth of field gave the foreground a bit of blur that added to the appeal.

Wednesday, June 11, 2014

Lens – Nikon 18-55mm


This is my original kit lens, and not just because I got it in a bundle with my D3000. It’s a great example of a lens with a middle-of-the-road focal length range and reliable quality. Thus it’s perfect for many different tasks. Though I don’t use it as much as I used to, it still works well when a shoot is likely to require adapting to a variety of conditions and I plan to concentrate more on my subjects than on my equipment. Note: the photo shows the lens with a third party lens hood attached.

Wednesday, June 4, 2014

Lenses – Nikon 10.5mm

For the next few weeks I’m going to blog about the lenses in my collection.

When I first got serious about photography, I entered the pursuit with three lenses: one that came with the camera and two I inherited from my grandma.

Since then my collection has expanded a bit. However, I try not to over-buy on lenses. Whenever I’m tempted to buy a new toy, I ask myself if it will really add anything to my ability to take pictures. Because I already have a solid range of focal length options, I rarely need to add anything new.


Though I keep a more “standard” lens on my workhorse camera, this lens is frequently on my second. I didn’t set out to like fisheye photography. Indeed, just the opposite. Normally I like my photos to look undistorted, as close as possible to what my eye actually saw. But I took a chance on an inexpensive fisheye glass for my Lensbaby, got hooked on wide angle and later splurged for this considerably more expensive lens. The distortion still kinda bothers me, but I love the wider views (especially for landscapes).

One day recently I took all my lenses down to Liberty Memorial. With my camera mounted on a tripod (to keep the results consistent), I shot pictures with each lens to demonstrate the effects of their focal lengths. Prime lenses like this one have only one photo, while zoom lenses have two or more photos to illustrate their full ranges.


Wednesday, November 20, 2013

Wells Overlook again

Nikon D3000, 10.5mm, 1/400, f/10, ISO 800

Though we were a little early for good fall colors (especially with the lingering summer heat and dry weather), a Saturday in late October proved to be our best opportunity to return to Wells Overlook to shoot some more pictures. This time I brought more equipment, including a tripod and a range of lenses.

My favorite of the set was a 10.5mm shot taken from the KU side of the tower (see above). I’m especially fond of what happens to the horizon when it’s positioned at the curving edge of the fisheye frame.

At the opposite end of the focal length spectrum, here’s a 500mm shot of the south side of KU’s main campus more than four miles away.

Nikon D7000, 500mm (150-500mm), 1/80, f/16, ISO 100, adjusted

Even with level adjustment in Photoshop, the colors end up somewhat washed out by the dust in the air (courtesy a stiff breeze and of course the distance from the subject).

Also note how flattened the perspective becomes at this focal length. It’s hard to judge the vertical distance between objects. Are the buildings in the foreground right next door to the dorms, or are they blocks away? That smokestack that looks like it’s part of the left edge of McCollum Hall is actually more than a mile behind it.

And to round things out at the end, here’s a view of the overlook tower taken from the bend in the road visible in the first shot:

Nikon D3000, 10.5mm, 1/800, f/14, ISO 800, cropped

Wednesday, October 16, 2013

State Fair – Portraits 1

Nikon D7000, 100mm (28-200), 1/500, f/5.6, ISO 800, cropped

The Missouri State Fair is an excellent place to practice “street photography,” part of which is the fine art of capturing ordinary people in their natural environment (so sort of like wildlife photography only with people).

The photo above is an example of what I was after. It captures the larger-than-life hype of the carnival midway and contrasts it with the ticket taker.

Here’s a similar shot:

Nikon D7000, 68mm (28-200), 1/640, f/4.8, ISO 800

This photo doesn’t pack the major distraction of the Snake Woman, so it’s easier to focus on the subject. Further, he stands as a singular subject amid a field of repeating patterns, which also helps him stand out.

Of course one way to draw the viewer’s attention to a particular subject is to eliminate everything around him.

Nikon D7000, 66mm (28-200), 1/100, f/4.8, ISO 400, cropped

This shot is close in enough that there isn’t much besides the guy to look at. Contrast that approach with a wider angle:

Nikon D7000, 28mm (28-200), 1/100, f/5.6, ISO 400, cropped

Now the man is lost in his surroundings. I love the chaos of over-sized prizes, the twilight lighting, the overall context of the shot. But I find myself less interested in who the man is, what he might be thinking at the moment the shutter clicked, where he got the tattoo on his arm. So it’s a trade-off.

Also note that both these shots were taken from approximately the same spot. A good zoom lens can come in handy when catching people in spontaneous moments.

Wednesday, September 25, 2013

The K at night

Nikon D3000, 10.5mm, 1/25, f/2.8, ISO 800

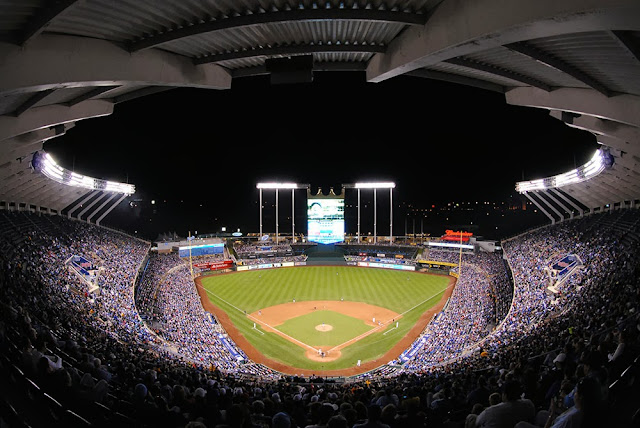
No sooner do I get the State Fair series going than I have to interrupt it for “breaking news.” With the end of baseball season fast upon us, I took advantage of our final Friday night at the ballpark to shoot some pictures.

I tried a few traditional shots of the game, but the longest lens I brought with me maxed at 200mm. From the back of the stands, it wasn’t exactly producing Sports Illustrated cover shots. Likewise my attempts at street photos of the crowd weren’t working. Perhaps I was in a moody mood, but I wasn’t feeling the people thing.

On the other hand, I found myself captivated by the light. I can’t remember the last time I strolled around the ballpark after dark. Usually by that point I’m in my seat watching the game. Thus the results I got tended to emphasize light and architecture.

The picture at the top of this post is my favorite of the set. I love what the 10mm lens did with the sunset. I also love what it did with the curving lines of the ramp. The shot has a range of elements from the industrial stuff at the bottom to the isolated people going about their business to the city in the distance and the sky above.

Funny how the ramp looks different depending on lens and perspective. Here’s another view:

Nikon D7000, 56mm (28-200), 1/60, f/5.6, ISO 800

From the back row of the upper deck, this is what the ballpark looks like:

Nikon D3000, 10.5mm, 1/60, f/2.8, ISO 800, adjusted

When I’ve shot this view in the past I’ve gotten closer to cut out some of the roof, but this time I thought it might be fun to include it. Besides, the large crowd prevented me from setting up much closer.

While I was up top, I noticed that the lights were catching smoke or steam or mist or something:

Nikon D7000, 100mm (28-200), 1/80, f/5.3, ISO 800, adjusted

This shot of the escalators gives you a nice sense of vertical space:

Nikon D3000, 10.5mm, 1/25, f/4, ISO 800

For perspective, note the size difference between the people on the closest escalator and the person next to the bottom.

I was a little disappointed by the Fan Zone (again, maybe I wasn’t in the mood for people shots). But I did manage to capture some fun motion blur from the carousel.

Nikon D3000, 10.5mm, 0.3 sec., f/8, ISO 800, cropped

Despite the absence of a tripod, I got the slow shutter speed to work by bracing my elbows on a rail. Note that the still parts of the shot (such as the picture of the bats in the center) are clear and the moving parts are streaks of light and color. That’s what you’re after in a shot like this.

Wednesday, April 24, 2013

Pinhole

Nikon D7000, Lensbaby Scout with pinhole optic, 6 sec., ISO 100, retouched

Inspired by an exhibit of Ruth Thorne-Thomsen’s photography at the Nelson, I decided to drag out the pinhole optic for my Lensbaby Scout and experiment with it.

When I first got the optic, I found myself frustrated with the lack of control it entailed. It’s difficult if not impossible to precisely aim a pinhole, so that wasn’t what I was used to at all. I also found the images fuzzy. Uniformly fuzzy, an aperture that small eliminating depth of field pretty much entirely, but fuzzy nonetheless.

After looking at the photos in the exhibit, I was comforted to learn that the fuzziness wasn’t something I was doing wrong. And the aiming issue was nowhere near as big a trick for me and my digital camera (where I could instantly check the results) as it would be for a film photographer or even an artist using light-sensitive paper (as Thorne-Thomsen did).

However, when I opened an experimental shot in Photoshop to adjust the light levels a bit, I noticed something interesting. The picture was speckled with dozens of tiny ghost images of the pinhole. I’d never encountered this before, but I’m assuming the effect is similar to what you’d get with a creative aperture. Click on the image to blow it up for a better look.

Nikon D7000, Lensbaby Scout with pinhole optic, 6 sec., ISO 100, retouched, enlarged

Wednesday, April 3, 2013

SAC Museum

Nikon D7000, 18mm (18-55), 1/160, f/6.3, ISO 200

Actually, this is the Strategic Air and Space Museum. But I’m used to this branch of the Air Force being called Strategic Air Command, so it feels better to me as SAC.

These shots of the SR-71 Blackbird in the main entry hall show off different lenses and different framing options. The first shot (above) is a fairly standard composition with one of my everyday use lenses. It’s at the lower end of its focal length range (18mm), so I’m getting a little distortion. But because the airplane itself is made of long, curving angles, the distortion doesn’t mess up the shot.

Nikon D3000, 10.5mm, 1/160, f/6.3, ISO 100

Now I’ve switched to my other camera, where I’ve got my 10mm lens mounted. On the minus side, this isn’t as dramatic a shot of the Blackbird. On the plus side, the wider angle provides a better sense of the space in the hall. I also like the frozen motion on the kid in the right-hand side of the shot.

Nikon D3000, 10.5mm, 1/160, f/6.3, ISO 100

Then by tilting up a bit I get this result. The top of this picture is actually the ceiling behind me, making for some strange perspective. I like the geometry of this image, the solid, iron-shaped roof floating in a web of thin lines.

Wednesday, March 13, 2013

Bee and flower

Nikon D7000, 55mm (18-55), 1/250, f/8, ISO 110

This shot should probably have been one of the Unblogged Favorites of 2012. I took it on the college’s nature trail during a class exercise.

For this shot I zoomed in as far as the lens would let me in order to avoid disturbing the subject. At this focal length, the depth of field is fairly narrow. The background is a complete blur, which is good because it helps focus attention on the foreground.

Wednesday, January 30, 2013

Seal

Nikon D3000, Lensbaby Scout single glass optic with bellows, 1/100, no f-stop, ISO 100.

I first worked with a macro lens many years ago, shooting pictures of a friend getting a tattoo. I fell instantly in love with the ability to shoot extremely close-up shots. Sadly, I haven’t had many occasions to do much macro work since then.

One of the toys I got for Christmas was a bellows attachment. It looks like this:


The bellows works with any lens (though some work better than others). It increases the focal length (the distance between the lens and the image-recording chip in the camera), which permits close-up work.

I took the shot at the top of this post with the bellows and a Lensbaby Scout with a single-glass optic in place. The lens produces the soft focus effect and allows in enough light to get a good exposure even with the bellows in use.

For size reference, the subject – a small seal made of yellow glass – is around the size of a thumbnail.

Monday, December 31, 2012

2012’s unblogged favorites – #1: Fisheye tree

Nikon D3000, 10.5mm, 1/125, f/5.6, ISO 200

For some time I’d had the notion that the horse chestnut tree in my front yard would make a great photo if shot with a wide-angle lens. The branches curve downward at an almost architectural angle, somehow suggesting a cathedral to me. This shot distorts the lines and brings out the effect quite well. The sun glimmering through the leaves doesn’t exactly hurt the effect, either.

This was the first shot I ever took with my new Nikon 10.5mm lens. Actually this is the second; the first caught my thumb in the corner. As I’ve been doing a lot of experimenting with fisheye photography this year, this seems like an apt shot to close out 2012.

Saturday, December 29, 2012

2012’s unblogged favorites – #3: Low rider

Nikon D3000, 10.5mm, 1/320, f/9, ISO 100

Overall the Maker Faire didn’t turn out to be as photogenic as I’d hoped. The crowd was huge, making it hard to get shots without a gaggle of gawkers standing between camera and subject. Most of the exhibits tended to be slow-moving robots, electronic doodads, tables covered in tschotchkes and other non-photogenic fare. However, the experience yielded a handful of good shots, such as this colorful photo of a car. The picture has proved useful in my Photoshop class, where I’ve used it to help teach color adjustment using channels.

Unfortunately, it also demonstrates how tricky it can be to keep yourself out of a fisheye photo. You can see the shadow of my head in the lower right-hand side of the shot.

Thursday, December 27, 2012

2012’s unblogged best – #5: Stadium ramp

Nikon D3000, 10.5mm, 1/250, f/8, ISO 100

This summer I shot a lot of photos at Kauffman Stadium, especially during All Star Game weekend. But some of them – such as this example – aren’t as obviously baseball pictures. I took this shot looking into the middle of the ramps to the upper levels. The ramps are somewhat unusual bits of architecture to begin with, and distorting them with a 10.5mm lens made them look still more interesting. One of my goals for 2013 is to do more night photography at the stadium, so with luck I’ll get the chance to catch this angle with more dramatic lighting.

Wednesday, December 26, 2012

2012’s unblogged best – #6: Dyche Hall gargoyle

Nikon D3000, 350mm (150-500), 1/500, f/6.0, ISO 360

Speaking of just down the street from Watson Library, KU’s Natural History Museum building sports a gaggle of gargoyles. As gargoyles were one of the photo themes for 2012, I couldn’t pass up the opportunity. As with the fire station and church statues, I used a 500mm lens to get close to details up near the roof.

Tuesday, December 25, 2012

2012’s unblogged best – #7: Watson windows

Nikon D3000, Lensbaby Scout with fisheye optics, 1/500, no f-stop, ISO 200

On the same day I shot the carrel photos from last week, I used the same fisheye lens to shoot some pictures from the front windows. Normally architecture invites calm, centered, balanced shot composition and a lens that won’t distort horizontal and vertical lines. But by bending a rule or two, I caught the Campanile, the green outside the library, a building or two down the street and even a bit of interior detail.

Thursday, December 20, 2012

Happy holidays

Nikon D7000, 10.5mm, 3 sec., f/8, ISO 100

Starting next Monday The Photographer’s Sketchbook will feature our eight favorite previously-unblogged photos of 2012. I actually finished the entries a couple of days ago, scheduled them to run and then put the blog to bed for the rest of the year.

Then the snow hit. Though it was really exceptionally cold outside, I did venture out to the deck to set the tree aright and shoot a few pictures. This one was the best. A low ISO and a three second exposure (thank you, tripod!) allowed me to bring out the dramatic oranges in the sky, a good contrast to the bright blue lights.

And because I can’t seem to shut the teaching thing off (even when I’m on break), here are a couple of other approaches to the same subject.

Nikon D7000, 18mm (18-55), 2 sec., f/8, ISO 100

The exposure here gives me a similar sense of light and color. Indeed, I love the strong blues (which is why I got blue lights for the tree to begin with). On the other hand, the shot composition isn’t quite as good. I also miss the dramatic sky.

Nikon D7000, 10.5mm, 1/4, f/8, ISO 100, Vivitar flash at 1/16 strength

The only differences between this flash-heavy shot and the available light picture at the top are the shutter speed and obviously the flash. At only 1/16 of full strength, the flash creates a nice effect; any stronger and the tree probably would have turned into a blob of bright white haze. I also like the snowflakes frozen in midair. Still, if this was The Shot from this set, I’d be strongly tempted to edit out the bird feeder.

Wednesday, August 22, 2012

Cave bear part two

Nikon D7000, 30mm (18-55mm), f7.1, 1/40, ISO 6400

We aren’t quite done with the bear skeleton yet. The last post was getting a little long, but the subject has a little more to teach us.

I took the photo above with the same camera but from a different angle and a slightly different focal length. This shot doesn’t provide as good a sense of the bear’s surroundings. But the Aaaaaagh! factor is much higher. Those teeth! Those claws! If this thing hadn’t been dead for millennia, I’d be in serious trouble right about now.

You can use this shot to apply what you learned last week. How could you edit this picture to make the bear stand out more? If you have a copy of Photoshop (or other image editing software), feel free to download the image and play around with it.

Now here’s the same subject shot with a different camera and lens:

Nikon D7000, 10.5mm, f3.2, 1/30, ISO 1600

The fisheye allows me to get the whole skeleton in while at the same time preserving the sense of menace. This would have been a tougher edit, however.

Before we leave the Field Museum, let’s look at one more subject: ISO. Museums tend to be good places to practice your exposure control. Subjects tend not to move around a lot, so you don’t have to fret about losing your shot. Still objects also eliminate a lot of shutter speed worries (if it isn’t moving, you don’t have to care much about subject motion blur). You will probably also encounter many different lighting conditions, which should keep you mindful of your shutter and aperture settings.

The big challenge is typically that museums tend to use lighting that’s pleasing to the eye but too dim for photography. The easiest way to compensate for the lower light (other than using a tripod, which most museums don’t allow) is to bump up your ISO, making your camera’s imaging chip more sensitive to available light. However, there’s a trade-off involved.

Nikon D7000, 22mm (18-55mm), f7.1, 1/40, ISO 6400, cropped
See how grainy the picture looks? That’s the result of turning up the ISO to 6400. The problem doesn’t show up in the larger picture. But when we “blow up” to the actual pixels, you can see where the camera’s chip is starting to make mistakes. That’s the ISO trade-off. Higher settings allow you to capture images in much lower light, but the quality of the picture can suffer as a result.

Wednesday, August 8, 2012

Exile Tattoo

Nikon D7000, 10.5mm, f/4, shutter 1/60, ISO 450

This shot shows you some of the advantages of shooting with a short focal length lens, in this case a Nikon 10.5mm lens. Lenses with extremely short focal lengths are sometimes called “fisheye” lenses for reasons that should be obvious when you look at the pictures they produce. Though there’s no official definition of the term, the fisheye bending effect is usually visible at lengths shorter than 15mm or so.

The biggest disadvantage to fisheye lenses is of course the distortion. Subjects toward the center of the shot usually come out okay, but the closer you get to the edge the more bending you get. Look at the doorway in the lefthand side of the shot, The frame is more or less okay on the right-hand side, but the left looks like something out of an old carnival funhouse.

Because fisheye lenses pack so much more information into your picture, it can be tough to get absolutely everything in the shot completely perfect. This exposure is good for the room on the left, but the exterior window way down the hall to the right is overexposed. Here it doesn’t ruin the shot, because the people are important and whatever might be going on outside the window isn’t.

Still, such lenses can be challenges. Try taking one outside on a cloudless day and you’ll soon find just how hard it is to keep the sun out of your shot.

On the other hand, fisheye lenses are great for capturing scenes. The wide angle allowed me to get not just the tattooist at work but also the rest of the shop, which of course would have been impossible with a longer lens.

For what it’s worth, this photo was actually inspired by another one I took a couple of months earlier:

Nikon D3000, Lensbaby wide angle, no f-stop, shutter 1/100, ISO 800

I shot this one with a Lensbaby Scout with wide angle optics installed. The focus problems are partially my fault; I’d been shooting closer to the subjects and forgot to readjust, and Lensbaby lenses don’t work with the camera’s autofocus feature. I might also have been able to reduce the vignetting (the darkness in the corners of the picture) by using an f-stop, which I would have needed to manually install prior to shooting.

Wednesday, July 25, 2012

Fire station gargoyles

Nikon D3000, 270mm (150-500mm), f/18, shutter 1/125, ISO 100, cropped

I grew up in a house just down the street from a fire station with gargoyles. Or to be more precise, the building is now a neighborhood center. But it was originally a fire station, and its gargoyles looked like firemen.

For years I’ve wanted good pictures of them. But relatively small objects high off the ground can be difficult to photograph. Here’s a view of the location from farther back with a shorter lens, so you can get an idea of the shooting conditions:


Nikon D3000, 20mm (18-55mm), f/8, shutter 1/250, ISO 100

For starters, I need to use a lens that will let me zoom in as much as possible, so I can stand on the ground yet get a photo that looks like I’m right next to the subject. In technical terms, what I need is a lens with a longer focal length.

So I switched from my usual 18-55mm Nikon lens to my 150-500mm Sigma. Because it’s fairly heavy, I mounted it on a monopod.

Standing on the sidewalk outside the building and aiming up, I got this photo with the lens zoomed in roughly halfway:

Nikon D3000, 270mm (150-500mm), f/18, shutter 1/125, ISO 100

Because I was shooting higher resolution images (the “large/fine” setting on the camera), I had plenty of data to work with when I loaded it onto my computer. I used Photoshop to crop the picture down, eliminating some unnecessary information around the edges and bringing out the details on the gargoyle. Now it looks so close we can count his teeth.

This cropping process is essentially what happens when a point-and-shoot camera uses “digital zoom” to make a picture look more close-up.

Personally, I prefer optical zoom (zooming done with the lens itself rather than by digitally “blowing up” the picture). I shot this image of one of the other gargoyles at the full 500mm limit of the lens:

Nikon D3000, 500mm (150-500mm), f/18, shutter 1/125, ISO 100, retouched

If I want to edit down to details, I can go this far without making it look “pixellated” (like a low-resolution computer image blown up too big):

Nikon D3000, 500mm (150-500mm), f/18, shutter 1/125, ISO 100, cropped, retouched