Wednesday, August 29, 2012

Bad was oil

Nikon D7000, 26mm, 1/250, f/8, ISO 200, retouched

In this shot from the Chicago lakefront, I’m having a little fun with a sign painted on the side of a barrel. By shooting it from an angle that hides part of the text, I’ve altered the meaning a bit.

This picture has also been slightly retouched to improve the vibrance. I made the change partially to start teaching myself to use Adobe Lightbox (a relative of Photoshop) and partially to give Lake Michigan a nice, Mediterranean azure hue.

This is what the unretouched photo looked like:

Nikon D7000, 26mm, 1/250, f/8, ISO 200

Wednesday, August 22, 2012

Cave bear part two

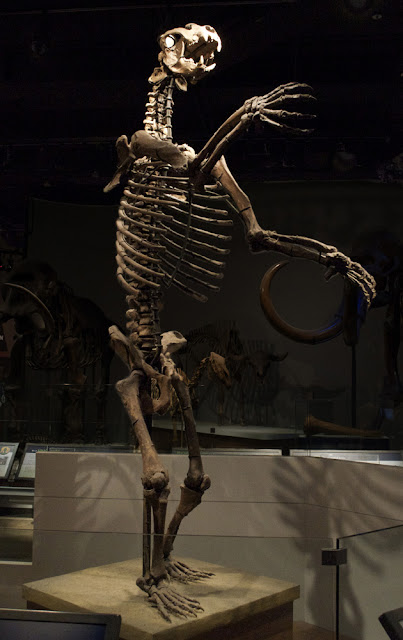
Nikon D7000, 30mm (18-55mm), f7.1, 1/40, ISO 6400

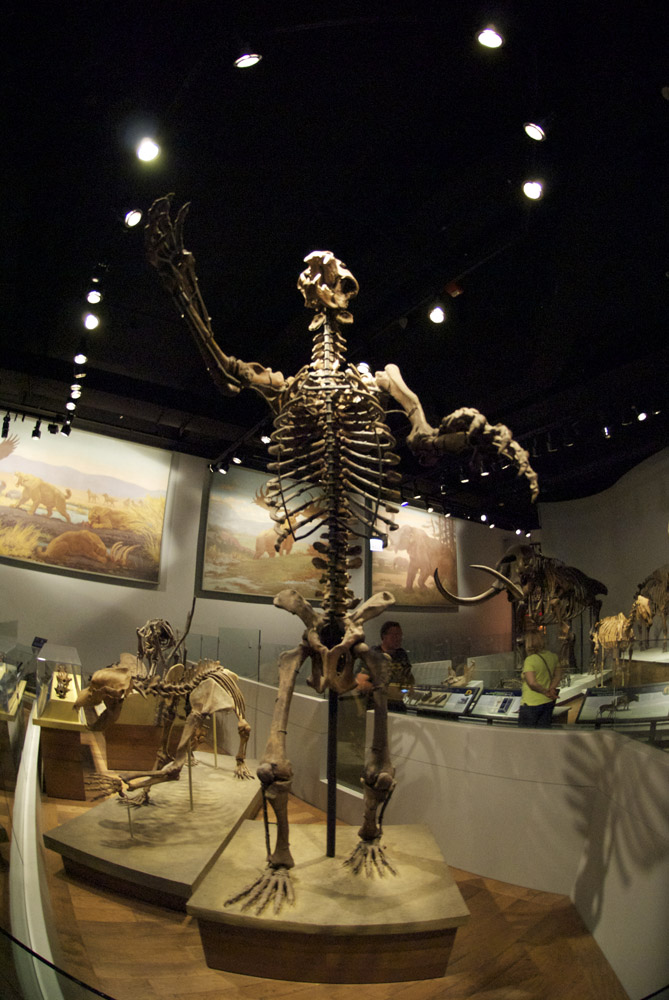
We aren’t quite done with the bear skeleton yet. The last post was getting a little long, but the subject has a little more to teach us.

I took the photo above with the same camera but from a different angle and a slightly different focal length. This shot doesn’t provide as good a sense of the bear’s surroundings. But the Aaaaaagh! factor is much higher. Those teeth! Those claws! If this thing hadn’t been dead for millennia, I’d be in serious trouble right about now.

You can use this shot to apply what you learned last week. How could you edit this picture to make the bear stand out more? If you have a copy of Photoshop (or other image editing software), feel free to download the image and play around with it.

Now here’s the same subject shot with a different camera and lens:

Nikon D7000, 10.5mm, f3.2, 1/30, ISO 1600

The fisheye allows me to get the whole skeleton in while at the same time preserving the sense of menace. This would have been a tougher edit, however.

Before we leave the Field Museum, let’s look at one more subject: ISO. Museums tend to be good places to practice your exposure control. Subjects tend not to move around a lot, so you don’t have to fret about losing your shot. Still objects also eliminate a lot of shutter speed worries (if it isn’t moving, you don’t have to care much about subject motion blur). You will probably also encounter many different lighting conditions, which should keep you mindful of your shutter and aperture settings.

The big challenge is typically that museums tend to use lighting that’s pleasing to the eye but too dim for photography. The easiest way to compensate for the lower light (other than using a tripod, which most museums don’t allow) is to bump up your ISO, making your camera’s imaging chip more sensitive to available light. However, there’s a trade-off involved.

Nikon D7000, 22mm (18-55mm), f7.1, 1/40, ISO 6400, cropped
See how grainy the picture looks? That’s the result of turning up the ISO to 6400. The problem doesn’t show up in the larger picture. But when we “blow up” to the actual pixels, you can see where the camera’s chip is starting to make mistakes. That’s the ISO trade-off. Higher settings allow you to capture images in much lower light, but the quality of the picture can suffer as a result.

Wednesday, August 15, 2012

Cave bear

Nikon D7000, 22mm (18-55mm), f7.1, 1/40, ISO 6400, cropped & retouched


This is the skeleton of a Short Faced Bear from the Field Museum in Chicago. These guys were serious business. For scale, imagine a person coming up to somewhere around the bottom of the bear’s rib cage.

Paleontologists believe these bears prevented human migration into the Americas for thousands of years. I suspect they did this by simply eating anyone stupid enough to try it. Still, it conjures images of the bears patrolling a checkpoint on the Bering land bridge.

“Oh no,” the bear says, making a twisting gesture with one giant claw. “Turn it around and march it right back where you came from. One look at y’all and we just know what you’ll get up to if we let you in here.”

Okay, down to photo business. As usual, I shot several pictures of this subject. This one turned out to be my favorite because by coincidence I happened to catch one of the ceiling lights right in the bear’s eye socket, giving it a devil skeleton bear look. And this was the 1666th picture I took with my D7000. Spooky.

On the other hand, the original shot required some editing. Here’s what it looked like straight out of the camera:
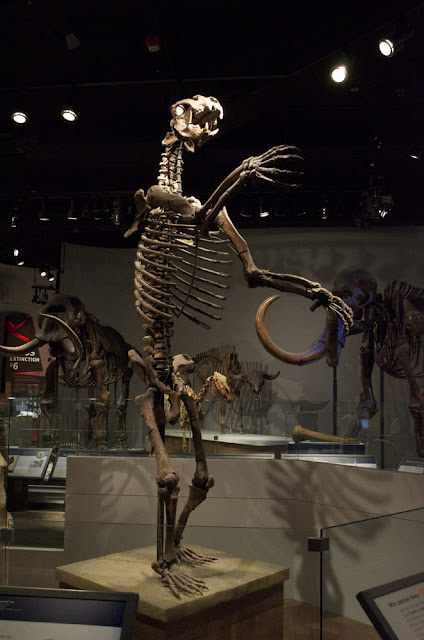
Nikon D7000, 22mm (18-55mm), f7.1, 1/40, ISO 6400

For starters, it needed a little cropping to emphasize the subject and improve the shot composition. But the real problem here is the distracting background stuff. For starters, the white dots of the ceiling lights floating in the black field are distracting. And worse, the bones behind the bear are creating a lot of visual “noise” that makes it harder to see the foreground subject, especially around waist level.

So off we go to Photoshop for some retouching. First I cropped the picture. Then I used the clone stamp tool to eliminate the floating lights. The tricky part was fixing the background. I didn’t want it to disappear entirely, but I didn’t want it messing with my bear. So I carefully masked the image, which looks like this on the screen:


With just the background selected, I darkened it up quite a bit. In the final version you can still get a sense of the space, but the rest of the skeletons are too dim to steal attention from the foreground subject.

Oh, and for what it’s worth: editing like this is fine if all you’re after is a better picture. But for a photojournalist, making these kinds of adjustments can create serious ethical problems. Folks who work for newspapers and news magazines are supposed to be capturing what they see and not eliminating elements just to make the picture look better. Some photojournalists have even been fired for removing elements or moving things around in their photos.


Wednesday, August 8, 2012

Exile Tattoo

Nikon D7000, 10.5mm, f/4, shutter 1/60, ISO 450

This shot shows you some of the advantages of shooting with a short focal length lens, in this case a Nikon 10.5mm lens. Lenses with extremely short focal lengths are sometimes called “fisheye” lenses for reasons that should be obvious when you look at the pictures they produce. Though there’s no official definition of the term, the fisheye bending effect is usually visible at lengths shorter than 15mm or so.

The biggest disadvantage to fisheye lenses is of course the distortion. Subjects toward the center of the shot usually come out okay, but the closer you get to the edge the more bending you get. Look at the doorway in the lefthand side of the shot, The frame is more or less okay on the right-hand side, but the left looks like something out of an old carnival funhouse.

Because fisheye lenses pack so much more information into your picture, it can be tough to get absolutely everything in the shot completely perfect. This exposure is good for the room on the left, but the exterior window way down the hall to the right is overexposed. Here it doesn’t ruin the shot, because the people are important and whatever might be going on outside the window isn’t.

Still, such lenses can be challenges. Try taking one outside on a cloudless day and you’ll soon find just how hard it is to keep the sun out of your shot.

On the other hand, fisheye lenses are great for capturing scenes. The wide angle allowed me to get not just the tattooist at work but also the rest of the shop, which of course would have been impossible with a longer lens.

For what it’s worth, this photo was actually inspired by another one I took a couple of months earlier:

Nikon D3000, Lensbaby wide angle, no f-stop, shutter 1/100, ISO 800

I shot this one with a Lensbaby Scout with wide angle optics installed. The focus problems are partially my fault; I’d been shooting closer to the subjects and forgot to readjust, and Lensbaby lenses don’t work with the camera’s autofocus feature. I might also have been able to reduce the vignetting (the darkness in the corners of the picture) by using an f-stop, which I would have needed to manually install prior to shooting.

Wednesday, August 1, 2012

The Ethnic Fest

Nikon D3000, 26mm (18-55mm), f/6.3, shutter 1/8, ISO 200

The Wyandotte County Ethnic Festival is an event full of energy and motion. Video cameras have no trouble capturing motion, but still photographers have to be a bit more clever about it.

One of our two options is motion blur. Allowing the subject to move during the exposure creates a blurry, streaky image the viewer will read as motion. The key is shutter speed. The shutter must remain open long enough for the subject to move.

In this example, a group of dancers are making their way to the stage. I’ve got the ISO set at 200, which is a little low for most indoor lighting situations. As a result, the shutter needs to stay open for a long time (1/8 of a second) in order to get enough light for a good exposure. The dancers moved a fair amount while the shutter was open, resulting in a nice motion blur effect.

But motion blur can be tricky. You only want blur on moving subjects, not the picture as a whole. The subjects can move, but the camera can’t. If your hands move at all (even as much as the pressure of your finger on the trigger) while shutter is open, it will blur your entire image and make it look terrible.

In this example (shot just a second or two before the good one above), the camera moved just a teeny bit, wrecking the image quality.

Nikon D3000, 26mm (18-55mm), f/6.3, shutter 1/8, ISO 200

Thus to pull off motion blur you will generally want a tripod, monopod or something else to brace your camera.

Wednesday, July 25, 2012

Fire station gargoyles

Nikon D3000, 270mm (150-500mm), f/18, shutter 1/125, ISO 100, cropped

I grew up in a house just down the street from a fire station with gargoyles. Or to be more precise, the building is now a neighborhood center. But it was originally a fire station, and its gargoyles looked like firemen.

For years I’ve wanted good pictures of them. But relatively small objects high off the ground can be difficult to photograph. Here’s a view of the location from farther back with a shorter lens, so you can get an idea of the shooting conditions:


Nikon D3000, 20mm (18-55mm), f/8, shutter 1/250, ISO 100

For starters, I need to use a lens that will let me zoom in as much as possible, so I can stand on the ground yet get a photo that looks like I’m right next to the subject. In technical terms, what I need is a lens with a longer focal length.

So I switched from my usual 18-55mm Nikon lens to my 150-500mm Sigma. Because it’s fairly heavy, I mounted it on a monopod.

Standing on the sidewalk outside the building and aiming up, I got this photo with the lens zoomed in roughly halfway:

Nikon D3000, 270mm (150-500mm), f/18, shutter 1/125, ISO 100

Because I was shooting higher resolution images (the “large/fine” setting on the camera), I had plenty of data to work with when I loaded it onto my computer. I used Photoshop to crop the picture down, eliminating some unnecessary information around the edges and bringing out the details on the gargoyle. Now it looks so close we can count his teeth.

This cropping process is essentially what happens when a point-and-shoot camera uses “digital zoom” to make a picture look more close-up.

Personally, I prefer optical zoom (zooming done with the lens itself rather than by digitally “blowing up” the picture). I shot this image of one of the other gargoyles at the full 500mm limit of the lens:

Nikon D3000, 500mm (150-500mm), f/18, shutter 1/125, ISO 100, retouched

If I want to edit down to details, I can go this far without making it look “pixellated” (like a low-resolution computer image blown up too big):

Nikon D3000, 500mm (150-500mm), f/18, shutter 1/125, ISO 100, cropped, retouched

Wednesday, July 18, 2012

Maker Faire 2012

Nikon D7000, 28mm (18-55mm lens), f/4.5, shutter 1/60, ISO 400, cropped and retouched

I’m surprised at myself. We’re three entries into this new blog, and this is the first entry about the most important photographic subject: people. Photographers who hope to make a living at their craft must become practiced at getting good shots of people, as most paying jobs (photojournalism, fashion, portraits, weddings and so on) require the skill. Even the casual snapshot will generally be of a friend, relative or other person.

This example comes from the 2012 Maker Faire in Kansas City. Events like this are great places to practice your people-photographing skills. Whatever bit of theatre this happened to be supplied good facial expressions from the actor and her young volunteer.

Here’s the original shot:

Nikon D7000, 28mm (18-55mm lens), f/4.5, shutter 1/60, ISO 400

After I loaded it onto my computer, I cropped it down to increase emphasis on the people and improve the shot composition. The figures now roughly follow the visual principle known as “Rule of Thirds.” The main action occupies the center of the shot, while the “mad scientist’s” body takes up the left third. The right third is relatively empty.

I also ran Photoshop’s auto-tone on it, improving the color quality. We’ll get into color tone in greater depth in a later entry. For now just note that the “after” version looks warmer, less grey.